A running toilet isn’t just an annoying sound; it can waste a significant amount of water and increase your utility bill. Understanding how to stop a running toilet is essential for every homeowner. Whether it’s caused by a simple malfunction or a more complex issue, learning to identify and fix the problem can save you time, money, and water. In this guide, we’ll explore the common causes behind a running toilet and provide step-by-step solutions to help you restore your toilet to proper working condition. By following these practical tips, you’ll be equipped to handle any toilet-related issue that may arise in your home.

What Causes a Toilet to Keep Running?
Several factors can cause a toilet to keep running. The most common culprit is a faulty flapper, the rubber piece that covers the flush valve, preventing water from flowing out of the tank. Over time, flappers can become worn or misaligned, leading to a continuous flow of water. Another common issue is an improperly adjusted float. The float controls the water level in the tank, and if it’s set too high, water will continuously flow into the overflow tube. A malfunctioning fill valve can also cause a running toilet. If the fill valve isn’t shutting off correctly, water will keep entering the tank, causing an overflow. Identifying the exact cause is the first step in learning how to stop a running toilet. By understanding the source of the problem, you can take the appropriate measures to fix it, ensuring that your toilet functions efficiently.
How to Stop a Running Toilet: Step-by-Step Guide
Check the Flapper
The flapper is often the main reason for a running toilet. To check the flapper, first, turn off the water supply to the toilet. Then, remove the lid from the tank and flush the toilet to empty it. Inspect the flapper for signs of wear or misalignment. If the flapper appears damaged or doesn’t seal properly, it’s likely the cause of the running water. Replacing the flapper is a straightforward process. Simply unhook the old flapper from the flush valve and attach the new one in its place. Ensure that the new flapper forms a tight seal, which will prevent water from leaking into the bowl. Once the new flapper is in place, turn the water supply back on and allow the tank to fill. Test the toilet by flushing it and observing whether the water stops running after the tank fills. If the water stops, you’ve successfully resolved the issue.

Adjust the Float
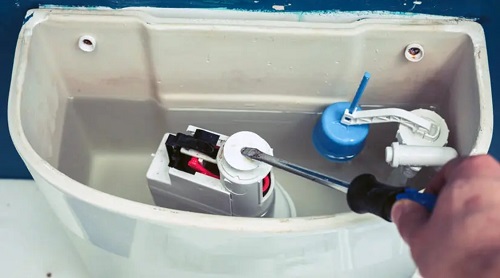
If the flapper isn’t the problem, the float might need adjustment. The float controls the water level in the toilet tank. If it’s set too high, water will overflow into the tube, causing the toilet to run continuously. To adjust the float, first, locate it within the tank. Depending on the design, the float may be a ball or a cup. For ball floats, bend the rod that connects the float to the fill valve downward to lower the water level. For cup-style floats, look for an adjustment screw on the valve and turn it to lower the float. After adjusting the float, flush the toilet to see if the water level is now correct. The water should stop about an inch below the top of the overflow tube. If the water level is correct and the toilet stops running, the adjustment was successful.
Inspect the Fill Valve
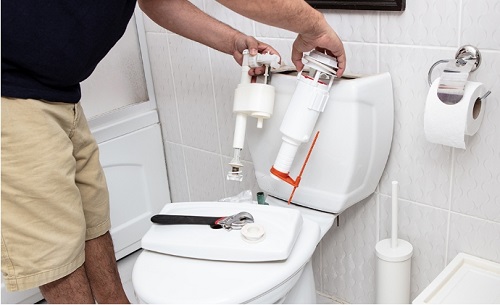
If the toilet is still running after checking the flapper and adjusting the float, the fill valve may be the issue. The fill valve controls the flow of water into the tank. Over time, it can wear out or become clogged with debris. To inspect the fill valve, turn off the water supply and remove the tank lid. Flush the toilet to empty the tank, then disconnect the fill valve from the water supply line. Inspect the valve for signs of wear or debris. If the valve appears damaged, it’s best to replace it. To replace the fill valve, follow the manufacturer’s instructions that come with the new valve. Reconnect the water supply, turn the water back on, and allow the tank to fill. Flush the toilet and observe whether the water stops running after the tank fills. If the fill valve was the problem, this should resolve the issue.
What If Your Toilet Keeps Running After Fixing It?
Sometimes, despite your best efforts, the toilet may continue running even after you’ve checked and adjusted the flapper, float, and fill valve. In such cases, the problem might be more complex, possibly involving the flush valve seat or the overflow tube. It could also be due to a misalignment of components within the tank. If you’ve tried the basic fixes and the toilet still runs, you might need to replace more parts or consult a professional plumber. While DIY solutions are effective for common issues, persistent problems may require expert intervention to prevent further complications. Knowing when to call in a professional is just as important as understanding how to stop a running toilet. Persistent issues, if left unaddressed, can lead to higher water bills and potential damage to your toilet or bathroom floor.
How to Prevent Your Toilet from Running in the Future?
Regular Maintenance Tips
Prevention is always better than repair. Regular maintenance can help keep your toilet in top condition and prevent running issues. Start by periodically checking the flapper, float, and fill valve for signs of wear or damage. Replacing these parts before they fail can save you from dealing with a running toilet. Additionally, make sure to clean the toilet tank regularly to prevent debris from clogging the fill valve or affecting the flapper’s seal. Another preventive measure is to avoid using chemical cleaners in the toilet tank. These cleaners can damage rubber parts like the flapper, leading to leaks and running water. Instead, opt for mild, non-corrosive cleaning solutions.
Upgrading Old Toilets
If your toilet is old and prone to frequent running issues, it might be time to consider an upgrade. Modern toilets are designed with more efficient parts that are less likely to fail. Upgrading to a new toilet can save water and reduce the likelihood of running issues. Look for models that are WaterSense certified, as these toilets are designed to use less water without compromising performance. Installing a modern toilet with advanced flushing mechanisms can also reduce the need for frequent repairs. While upgrading involves an initial investment, the long-term savings on water bills and reduced maintenance make it a worthwhile option.
Conclusion
Knowing how to stop a running toilet is a valuable skill for any homeowner. By understanding the common causes and following the step-by-step guide provided, you can quickly identify and fix the issue, saving water and reducing your utility bills. Regular maintenance and, if necessary, upgrading to a modern toilet can also prevent future problems, ensuring your toilet operates smoothly for years to come. Remember, while many running toilet issues can be resolved with DIY solutions, don’t hesitate to seek professional help if the problem persists. Maintaining a functional toilet is essential for a comfortable and efficient home.
FAQs:
1: Why does my toilet keep running after I flush it?
Your toilet might keep running after flushing due to a faulty flapper, a misaligned float, or a malfunctioning fill valve. Check these components to identify the cause.
2: How can I tell if the flapper is causing my toilet to run?
If the flapper is causing your toilet to run, you may notice it not sealing properly after a flush, allowing water to leak continuously into the bowl.
3: Is it expensive to fix a running toilet on my own?
Fixing a running toilet on your own is generally inexpensive. Most issues can be resolved by replacing low-cost parts like the flapper or adjusting the float.
