Knowing how to turn off water to toilet is an essential skill every homeowner should master. Whether you’re dealing with a leak, need to perform a repair, or simply want to save water, shutting off the water supply to your toilet can prevent potential damage and save you from costly repairs. Toilets are one of the most frequently used fixtures in a home, and understanding how to manage their water supply can significantly reduce the risk of water-related issues. This guide will walk you through each step of the process, ensuring you can handle this task quickly and efficiently. By following these instructions, you’ll not only be able to manage your toilet’s water supply but also gain the confidence to tackle other basic plumbing tasks. Mastering this simple yet vital process ensures that you can perform maintenance and respond to emergencies without hesitation.

Why You Need to Know How to Turn Off Water to Toilet
Understanding how to turn off the water to your toilet is crucial for maintaining a well-functioning bathroom and preventing unnecessary water waste. One of the primary reasons you should know this process is to stop a running toilet. A toilet that continuously runs can waste a significant amount of water, leading to higher utility bills. Moreover, if your toilet is leaking, shutting off the water supply is the first step to prevent water damage to your floors and walls. This knowledge also comes in handy when performing routine maintenance or replacing parts such as the flush valve, fill valve, or the entire toilet. Additionally, in the event of an emergency, such as an overflowing toilet, knowing how to quickly shut off the water can prevent a minor issue from becoming a major disaster. Having the ability to control the water supply to your toilet empowers you to handle these situations calmly and effectively, saving you time, money, and stress.
Common Scenarios for Shutting Off Water
There are several common scenarios where you might need to shut off the water to your toilet, and understanding these situations can help you be better prepared. One of the most frequent reasons is when the toilet is leaking or the water won’t stop running. In these cases, turning off the water supply prevents further water waste and damage while you assess and repair the issue. Another scenario is during routine maintenance or when replacing toilet parts such as the flush valve, fill valve, or even the toilet itself. By shutting off the water, you ensure a dry and safe working environment, avoiding any accidental water spillage. Additionally, if you’re planning a renovation that involves relocating the toilet or replacing bathroom flooring, turning off the water supply is a necessary step to prevent flooding during the process. Lastly, in an emergency, such as an overflowing toilet, shutting off the water supply quickly can prevent extensive water damage to your home. Being aware of these scenarios and knowing how to respond can save you from unnecessary headaches and expenses.

How to Turn Off Water to Toilet Step-by-Step
Locating the Shut-Off Valve
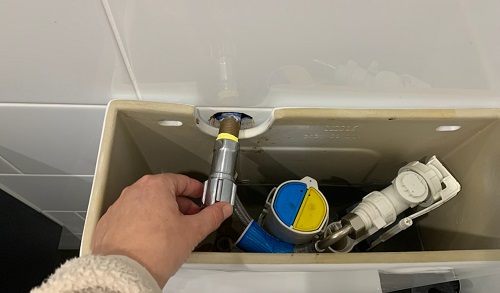
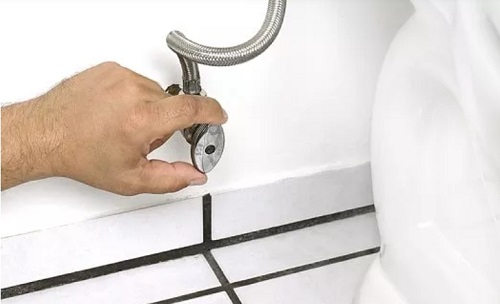
The first and most important step in turning off the water to your toilet is locating the shut-off valve. This valve controls the flow of water to your toilet and is usually found on the wall behind the toilet or on the floor near the base of the toilet. It’s typically a small, oval-shaped handle connected to a pipe leading to the toilet tank. The shut-off valve might be positioned close to the wall or floor, making it easy to overlook if you’re not sure where to look. In some cases, the valve may be concealed behind a cover or panel, particularly in bathrooms with more elaborate designs. Knowing the exact location of this valve is crucial because, during an emergency, every second counts, and being able to find and operate the valve quickly can prevent a small problem from escalating. Once you’ve identified the valve, you’re ready to proceed with shutting off the water supply. Keep in mind that regularly checking the valve’s location and ensuring it’s in good working order can save you time and effort when you need to use it.
Turning Off the Water Supply
Once you’ve located the shut-off valve, the next step is to turn off the water supply to the toilet. To do this, simply turn the valve handle clockwise until it stops. This action closes the valve and cuts off the water flow to the toilet, preventing any further water from entering the tank or bowl. It’s important to turn the valve slowly and steadily to avoid damaging the valve or the connecting pipes. After the water supply is turned off, you should flush the toilet to drain the remaining water from the tank and bowl. This step ensures that no water remains in the toilet, which is particularly useful if you’re planning to perform repairs or replace parts. It also prevents any unexpected water leakage while you work. If the water doesn’t stop flowing after you’ve turned the valve, you may need to check if the valve is fully closed or if there’s an issue with the valve itself. In most cases, however, turning off the water supply at the shut-off valve is a straightforward and effective way to manage your toilet’s water flow.
What to Do If the Valve Is Stuck
Occasionally, you might encounter a situation where the shut-off valve is stuck and difficult to turn. This can happen if the valve hasn’t been used in a long time or if it’s been exposed to moisture and has started to rust or corrode. If you find the valve stuck, it’s important not to force it, as this could cause damage to the valve or the pipes, potentially leading to a more serious issue. Instead, start by applying a penetrating oil, such as WD-40, to the valve stem. Let the oil sit for a few minutes to work its way into the valve. After allowing the oil to penetrate, try gently turning the valve again with your hand. If it still won’t budge, you can use a pair of pliers or a wrench to carefully apply more force. Be sure to turn the valve slowly to avoid breaking it. If the valve remains stuck despite these efforts, you may need to shut off the main water supply to your home and replace the faulty valve. Regular maintenance, such as turning the valve periodically, can help prevent it from becoming stuck in the future.
Troubleshooting Issues After Shutting Off Water
Checking for Leaks
After you’ve turned off the water to your toilet and completed any necessary repairs, it’s crucial to check for leaks before you consider the job finished. Start by slowly turning the shut-off valve counterclockwise to restore the water flow to the toilet. As the water flows back into the toilet tank, closely monitor the area around the shut-off valve, the connections to the toilet, and the base of the toilet. Look for any signs of dripping water or pooling around these areas. If you notice any leaks, you’ll need to tighten the connections or make additional adjustments to ensure everything is properly sealed. Even a small leak can lead to significant water damage over time, so it’s essential to address any issues immediately. If you’re unable to stop the leak, it may be necessary to replace the affected parts or consult a professional plumber for assistance. Ensuring that all connections are secure and leak-free before finishing the job gives you peace of mind and prevents future problems.
Restoring Water Flow
Once you’ve confirmed that there are no leaks, the final step is to fully restore the water flow to your toilet. To do this, continue turning the shut-off valve counterclockwise until it is fully open. Listen carefully for the sound of water filling the toilet tank. It’s important to restore the water flow gradually to avoid causing any pressure surges that could lead to leaks or damage to the toilet’s internal components. After the tank is filled, flush the toilet to ensure it operates correctly. If the toilet doesn’t refill or flush properly, there might be an issue with the shut-off valve, the fill valve, or another internal component. In such cases, double-check your work to ensure everything is connected and functioning as it should be. If the problem persists, you may need to replace faulty parts or seek professional help. Restoring the water flow correctly is crucial for ensuring your toilet functions efficiently and effectively, allowing you to resume normal use without concerns.
Conclusion
Learning how to turn off water to toilet is an essential skill that every homeowner should possess. It empowers you to take control of your home’s plumbing system, ensuring that you can handle minor repairs, maintenance tasks, and emergency situations with confidence. By following the steps outlined in this guide, you’ll be able to locate and operate the shut-off valve, troubleshoot common issues, and prevent potential water damage. This knowledge not only helps you maintain your bathroom fixtures effectively but also saves you time, money, and stress in the long run. Whether you’re dealing with a leaky toilet, performing routine maintenance, or preparing for a bathroom renovation, being able to turn off the water to your toilet is a valuable skill that enhances your ability to manage your home’s plumbing. With this guide, you’re now equipped to handle this task efficiently and effectively, ensuring your toilet operates smoothly and your home remains protected from water-related issues.
FAQ:
1. What if my toilet doesn’t have a shut-off valve?
If your toilet doesn’t have a dedicated shut-off valve, you’ll need to turn off the main water supply to your home. The main water valve is usually located near your water meter or where the main water line enters your house. Shutting off the main supply will stop water flow to all fixtures, including your toilet.
2. Can I turn off the water supply without turning off the main water line?
Yes, most toilets have a separate shut-off valve that allows you to stop the water flow to the toilet only. This is much more convenient than shutting off the entire water supply to your home, as it allows you to continue using other fixtures while working on the toilet.
3. How often should I check the shut-off valve to ensure it works?
It’s a good idea to check your toilet’s shut-off valve every few months. Turn it off and on to ensure it moves freely and isn’t stuck. Regular maintenance can prevent the valve from seizing up and ensure it’s ready to use in an emergency.
